Pages

Friday 15 March 2013

Follow up- our beautiful make ups!

Hello hello,

How is everyone?

We had an amazing night last Saturday! With a very artistic start-a long make up session for each of us at home and then there was a great music and lots of dancing at a very nice club! Fun fun fun!

Here are the follow up images to the previous post:

Make up artist Juli hard at work:


My beautiful make up with red feathers.
My beautiful make up with red feathers and new designed red dress.


Amazing silver eye make up!

All satisfied and ready to go!

Don't we look just lovely??^_^

Have a fantastic weekend folks!

Gosia

xx

Friday 8 March 2013

Be bold! Rich and colourful make up inspiration.

Good afternoon.

How are you all????

I'm going dancing tomorrow and I'm very excited about it! It's been ages since I last went. I don't like the music you know.. It's all  the same noise in most places nowadays to me. It's funny when I comment on it this way I sound like my own dad who disapproved of what my sisters and I listened to as teenagers but mind you the music back then in the 90s wasn't half as bad! ^_^
My friends and I found a place with 60s, 70s and 80s music so it sounds really fun and I wanna dress up too ^_^ Or at least have fun and colourful make you. I'd love that! I'm sure my friend who's a make up artist would enjoy this challenge a lot.

Wouldn't you like anything in this style for your night out? They are just so amazing, aren't they!?


I think peacock theme eye shadows are my favourite!


I love the feathers!


Great picture!!

Awesome eye lashes!!


That's me in this lovely bold make up by Juli


As I said I LOVE COLOURS!!^_^
I made myself a dress for the occasion too, it's red with asymmetrical hem-a bit shorter front. I have a very cool leather obi belt to go with it, it is quite long and shapes the waistline really nicely.

Have a fun weekend everyone!

Gosia
<3

Saturday 2 March 2013

Notebook Cover Tutorial

Hello and happy weekend everyone!

How was your Saturday?? Mine was very productive and fun! Playing with beautiful printed fabrics is what I love^_^

There are so many lovely fabrics out there, don't you just love all the colours and fun prints?
 I DO!!! My favourite way to sew with them is patchwork and quilting, they look amazing, the more different patterns the better.

I made this patchwork neck pillow a while ago:


These fabrics come from various Tilda's collections, they are so pretty! My pillow is super comfy and I use it all the time. If you want to sew your own you can purchase my PDF pattern and instructions  here.

And today I was working on a super sweet notebook/ book cover and I will share the tutorial with you. Give it a go, it's so much fun! And the book looks a lot better!^_^
 I want to fill it in with all my creative ideas!


BOOK COVER TUTORIAL

 You will need:

-scraps of various fabrics
-lining fabric ( I used cotton)
-light weight wadding
- 2.5 cm wide bias binding
-scissors
-self- healing mat
-tape measure
-3 ribbons of different colours
-rotary cutter
-sewing machine

First measure you book/notebook:


Add 3 cm (that will be your seam allowance). Mine measures 36 cm x 24.5 cm (incl seam allowance).
Now determine how many patchwork squares you will need. I am using 5 x 5 cm square template to cut mine and I would need 60 pieces.

And here the fun part starts.. Be bold and choose fabrics with lots of different prints and colours.
I use a rotary cutter and a self-healing mat as this way you can cut more than one square at a time and they are more accurate but you could also use scissors.

Lay out your fabric squares. Place them in a desired pattern, label them so you remember the order later on.


You will also need to cut a piece of wadding and a lining fabric using your notebook measurements (incl 1.5 cm seam allowance),  cut 2 flaps too- the same length as the lining and for the width - a bit more that a quarter of the lining's width.

All the pieces

 Sew the squares together to form rows using a 1 cm seam allowance. Press each row when 

finished to the same side:


Stitch all the rows together and press.
Neaten flaps' outside edge with a zig zag stitch, turn under 1 cm to the wrong side, press and stitch. I used a decorative stitch for that:


I hand printed a small design on one of the flaps in advance:


Lie the fabrics right sides facing together and stitch the flaps on the patchwork piece:


I wanted to add heart appliques on the cover front:


 Now stitchsides of the lining to hide flaps' stitches- sandwich the flaps and stitch:


Turn it inside out, sandwich the wadding and stitch all the way around.


Almost ready!^_^  Stitch 2 zig zag lines down the center.

Stitch on the ribbons right in the center, cut them all a bit longer than your notebook length. I cut mine in various lengths:


Now we are going to hide these horrible raw edges by adding bias binding:


I wanted to add small hearts on to the ribbons...
For that you need to cut 3 pairs of hearts in different colours and 3 wadding to go inside of each- if you want them to be a bit puffed. Stitch with a zig zag in a contrasting thread.


And... It's done!! Congratulations!


And with the notebook:


Let me know if you try to make your own cover and if you do I hope you have as much fun as I did! Oh and please share, I would love to see what you come up with.

Gosia

xx

Wednesday 27 February 2013

Personalized Designs For Babies

Hello and good afternoon!

What an amazing day we are having here in Edinburgh! The sun is shining and not a cloud in the sky! That's a very rare thing for us! The city always comes alive on days like this! The sun makes it all the more amazing!
I have all the windows open and I am enjoying those sun rays creeping into my studio.
I have lots of sewing to do, very busy and very happy^_^

This morning I was shortening a few vintage maxi dresses and making up skirts on thick black elastics from the cut offs, the change is amazing. But enough about that! I wanted to focus this post on personalized designs that I have been working on lately and share them here.

This is a baby blanket with appliqued name, it's made of heavy cotton with really nice prints, backed with soft baby blue fleece and a contrasting dark blue bias banding. It turned out quite nice, didn't it?

Here is my work in progress:


securing appliqued letters with satin stitch


Attaching bias binding

And here it is!!^_^


And now personalized monkey toy for a new born baby- made of fleece, felt and cotton with hand embroidered name, date and even time! Isn't it just sweet?


Hello!!Here I am!!


And another blanket for a baby girl this time. It has sweet felted creatures stitched onto it and hand embroidered name. What do you think of this one? Cute, huh??


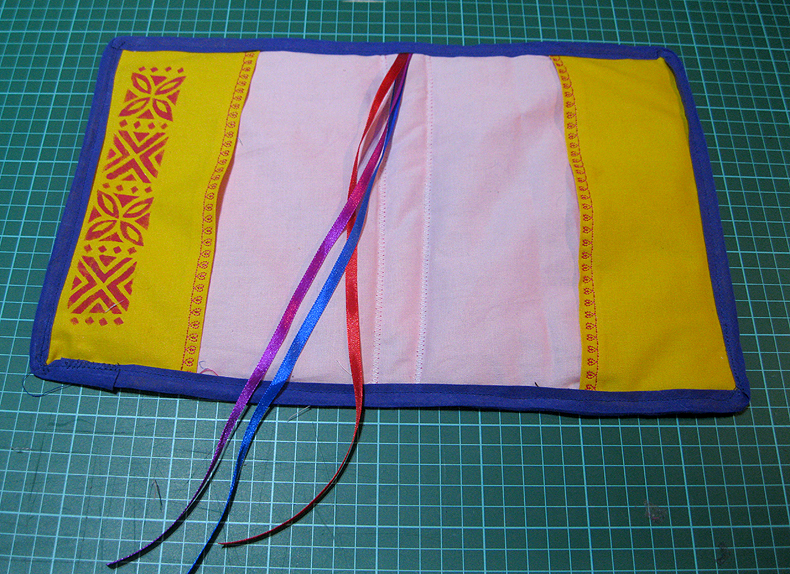
And last but not least baby quilt. Oh so pink!! With appliques and a thick wadding inside, so warm!


Oh what a collection!^_^
There will be more so please come back again.

And in the meantime have a lovely day!

Gosia

xx

Wednesday 20 February 2013

Something a bit different

Good afternoon,

Hope you are all well, having a great and productive day!
I have had an early start as there were a lot of things lined up for me to complete today.
I was just on my short break and when browsing the net for a nice read I stumbled upon this amazing article that I would like to post here for everyone to read.

Do you ever get this feeling when you wish you had known what to do at one or another point in your life to avoid unwanted repercussions, had someone to give you a piece of advice when you were a kid?  When I look back on my own life I often wish there was someone there to prepare me for what was to come when I was just starting out my life but then again I know was a stubborn teenager and most likely wouldn't have listened back then anyway.
Of course there is no point in regretting anything that has happened as that leads absolutely nowhere but it's always great to hear an experienced point of view so listen when they speak because you know what?  ''Time is something you’ll never get back''.

It's a great read!

Enjoy!


''20 Things I Wish I Had Known When Starting Out in Life''


Gosia

xxx

Tuesday 19 February 2013

Puppy obsession

Hello and good afternoon!

It's a lovely day here in Edinburgh however this sun shining so brightly today is very deceptive!
I went out without previously checking the temperature,  wearing a light jacket, I grabbed a pair of sunglasses too but oh brrr it's actually freezing! I should have worn a hat and gloves! Those sunglasses definitely didn't keep me warm! So it had only been a short walk and now am back in!

Today I would like to share my new obsession- puppies. I've always loved huskies and dalmatians but after coming across this picture a few days ago my obsession has begun!


 I have been wanting a puppy like this one ever since! Isn't he just the cutest thing ever?
And that red hoodie makes him look so adorable! In fact I can picture myself sewing fashionable and sweet hoodies for him! Oh and I've already picked a name for my puppy too- Diego^_^

I've been browsing amazing handmade puppy versions on Etsy.
 I'm sharing with you just a few of my favourites:

Oh so sweet!!!


Oh so artistic

Oh so cuddly


Oh so vintage
Oh so lovely
Oh so warm
Oh aren't they all so sweet?!?  I hope now we are all obsessed with puppies if not the real ones then those so unique that have been handmade with lots love !^_^

Have a lovely day!

Gosia

xxx

P.S Having read a bit more about Huskies sadly I have to admit I don't qualify to own one just yet, they require so much space( as they are very energetic!) which I don't have as I live in a small flat and apparently they -like all the other puppies- love to chew clothes etc and I would be constantly worried about my fabric collections!And my creations..
So in the meantime I'll stick to admiring the puppy in the hoodie from the picture.